

How to Use AutoTools with Tasker (Guide)
Tasker is one of the nigh popular automation tools for Android. While information technology is a chip complicated to utilise, it can offer a lot of customization options for your device if used properly. Even though Tasker in itself is very powerful, there are several plugins for information technology that brand information technology a beast. That beingness said, one of the about useful plugins out there is AutoTools. Information technology adds many functionalities to Tasker, most of which I'll be covering in this article. Just before we get there, allow me first tell you how to add together AutoTools to Tasker.
Add AutoTools to Tasker
The kickoff and the most obvious step to add AutoTools, or any plugin for that thing, is to have the Tasker app (7-day trial, $two.99) installed on your device. Once yous do that, follow the steps given below.
- Download AutoTools (30-day trial, full with in-app purchases)from the Play Store and install it on your device.
- At present open up Tasker and navigate to its "Tasks" tab. Hither, add a new task past tapping on the plus icon on the bottom-right of the screen. You can choose whatever name for this.
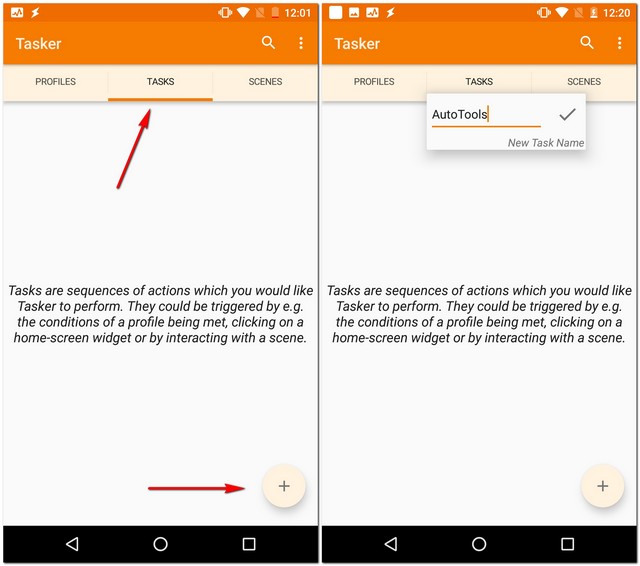
- You lot'll now exist required to add an action for this task. To do this, again tap on the plus icon on the bottom-correct of the screen, and then cull "Plugin".
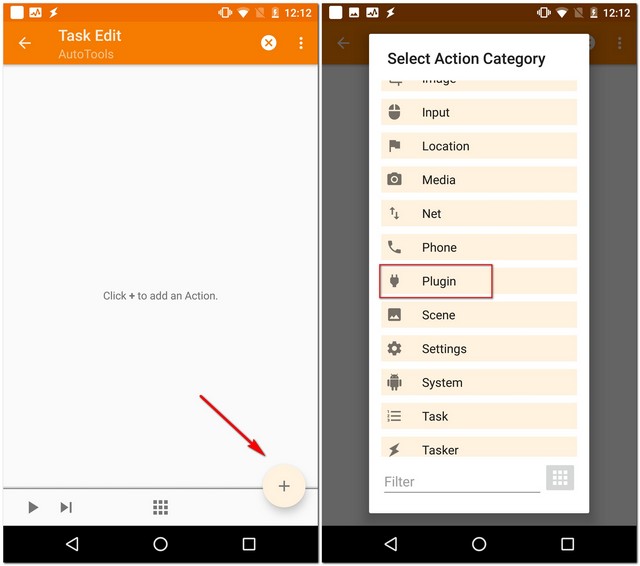
- You should now encounter a listing of all the Tasker plugins that you accept installed on your device. Choose AutoTools from this list past tapping on information technology. You will now see another list – this time of the multiple actions that you can practice with the plugin.
At present that you lot know how to add AutoTools to Tasker, yous can attempt the endless number of customization options offered by the plugin. Though going for the detailed explanation for each them is beyond the scope of this article, we'll even so go through some of the possibilities.
Customization Options Offered By AutoTools
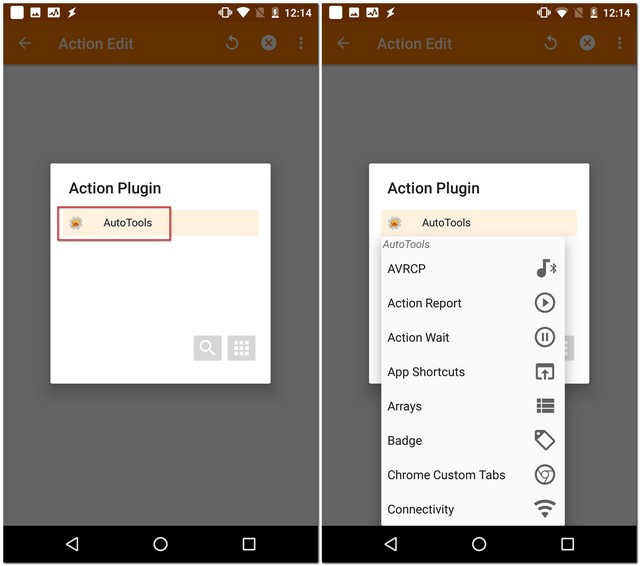
The AutoTools plugin offers many actions like App Shortcuts, Connectivity, Flashlight, Launcher etc. Each of these actions can further offer a wide range of customization options, thus increasing the number of possibilities for you. For starters, y'all can use "Web Screens" to become Samsung devices-similar edge shortcuts, "Secure Settings" to turn on the GPS automatically when you open up Google Maps and vice-versa, and "Launcher" to switch betwixt unlike launchers automatically depending on your location. But that's not all – this list is simply a teaser; in that location are tons of other things that you can exercise with AutoTools. To requite you lot a short glimpse, I'll explicate how to go edge shortcuts on whatever Android device.
Get Samsung Devices-Similar Edge Gestures
I thing that Samsung does the best is using amazing displays on their devices. With the introduction of edge screens with the Galaxy S6 Edge, they took full advantage of it by implementing shortcuts that could exist accessed by swiping from the edge of the screen. Given the praise that this feature got, it didn't come up as a surprise to meet AutoTools offering information technology as a feature for whatsoever other Android smartphone. If you wish to know how to set it up, read the steps mentioned beneath.
1. Create a Swipe Screen
The first footstep involved in this procedure is creating a swipe screen using the AutoTools plugin. This will permit you to prepare a command by swiping from the side of your screen. To do that, there are certain steps that you'll have to follow.
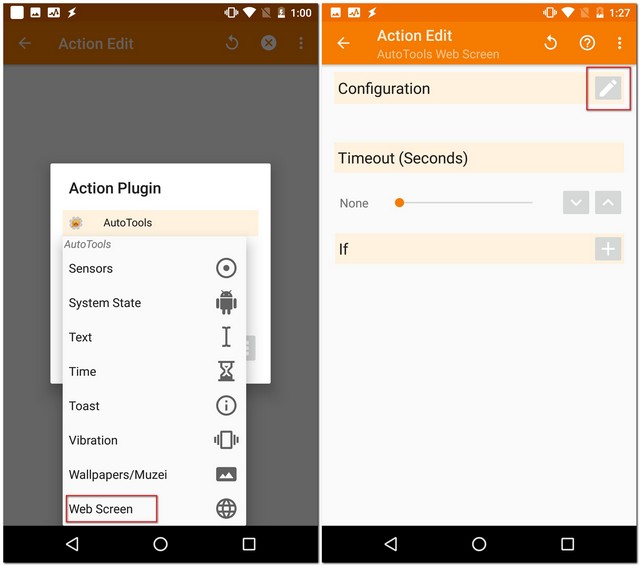
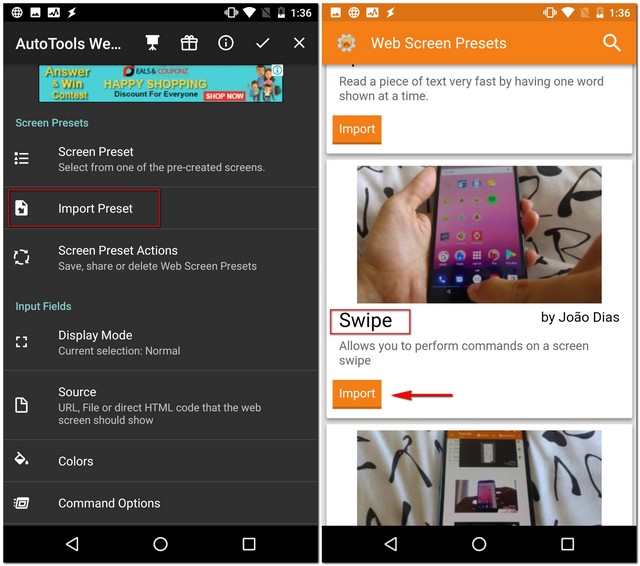
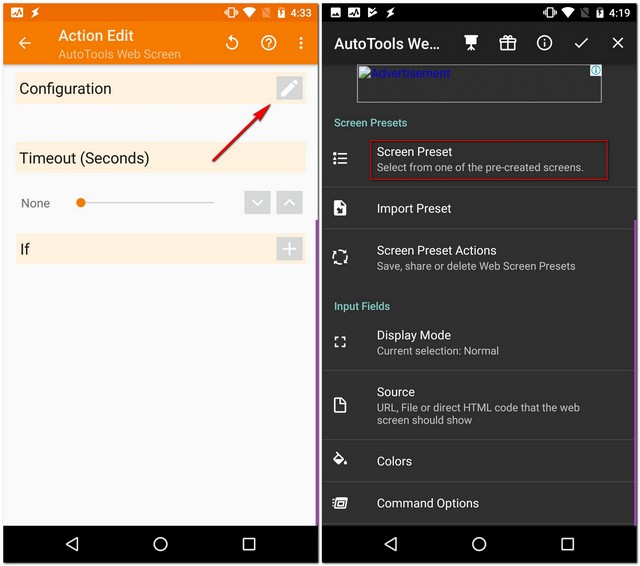
- Firstly, select "Web Screen" from the AutoTool'southward list. Then tap on the edit icon next to "Configuration".
- From the next screen, tap on "Import Preset". Now scroll down to "Swipe" and and then tap on "Import". This will change the preset to Swipe.
- To confirm, tap on "Screen Preset" and brand sure that "Swipe" is selected. Once you do that, roll to the bottom till you lot find "Commands" under "Screen Variables" and then tap on it.
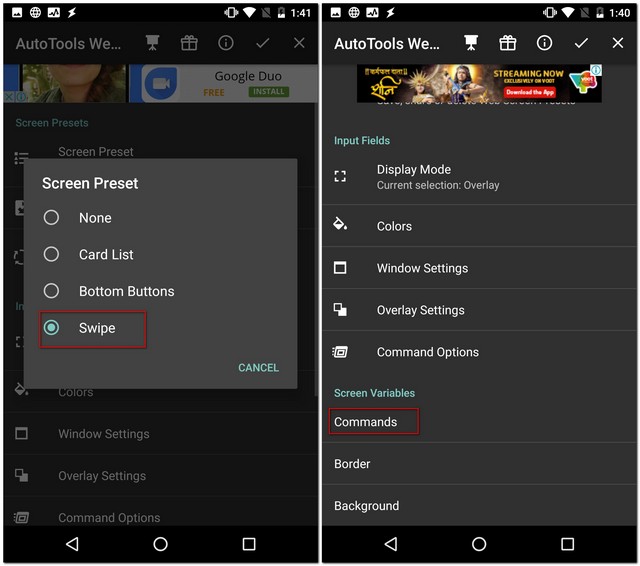
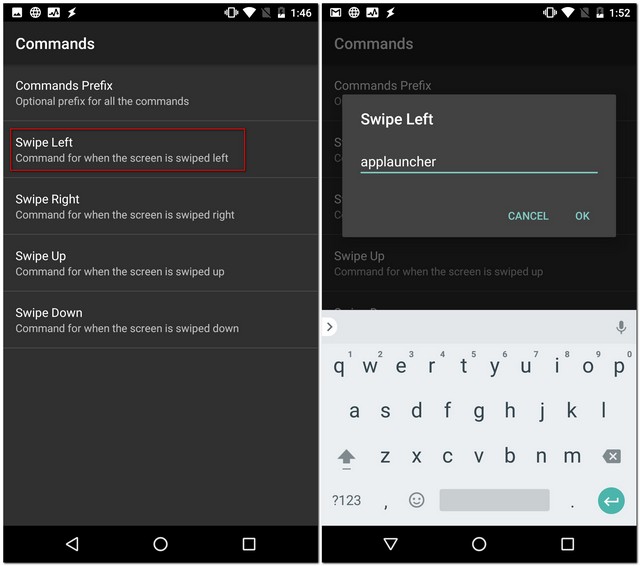
- Now, on the following screen, tap on "Commands Prefix" and clear the field. Make certain aught is typed in that location and then tap on "OK". Repeat this for all the different commands – "Swipe Left", "Swipe Right", "Swipe Up", and "Swipe Down".

- Tap on "Swipe Left" again, simply this time, type "applauncher" in the input field and so tap on "OK".
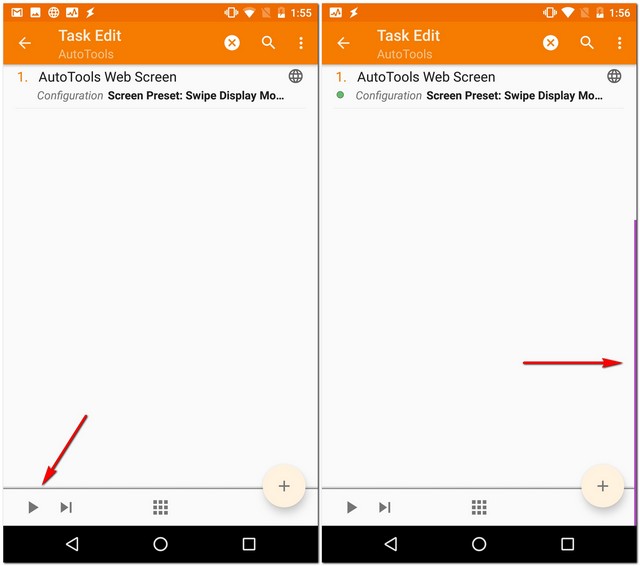
- Now become back till yous reach the "Job Edit" page (you volition have to tap on the dorsum button three times from the Commands screen to get at that place). Hither, tap on the Play button on the bottom-left of the screen to outset the task. You lot should now see a sparse purple line along the right-side of the screen.
2. Create App Launcher
Now that yous've created a swipe screen, you lot will be required to create the app launcher. For that, you'll offset have to install AutoApps (gratuitous with in-app purchases) and AutoLaunch (free with in-app purchases). After that, follow the steps below to continue.
- On Tasker'south home screen, navigate to the "Profiles" tab. Now add i by tapping on the plus icon on the bottom-right of the screen. From the list that yous run across now, select "Result" and then cull "Plugin".
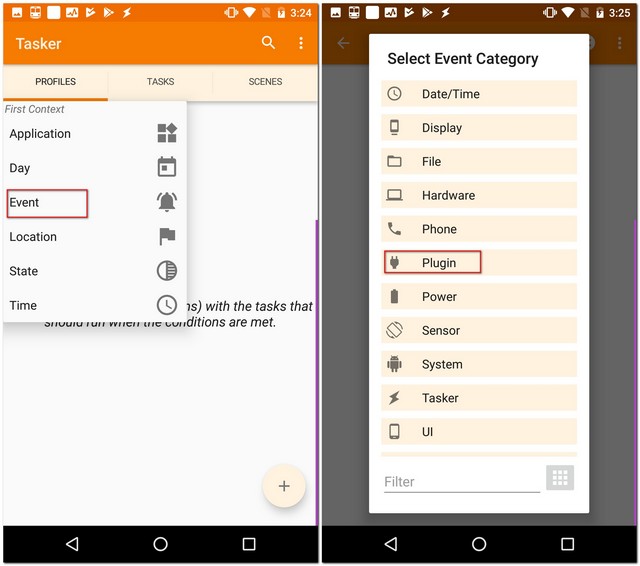
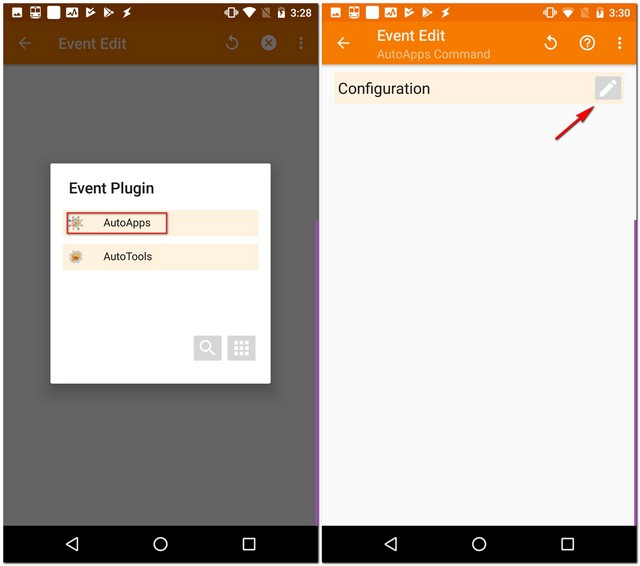
- Again, yous'll see the list of Tasker plugins on your device, but this time, choose "AutoApps". Next, tap on the edit icon confronting "Configuration".
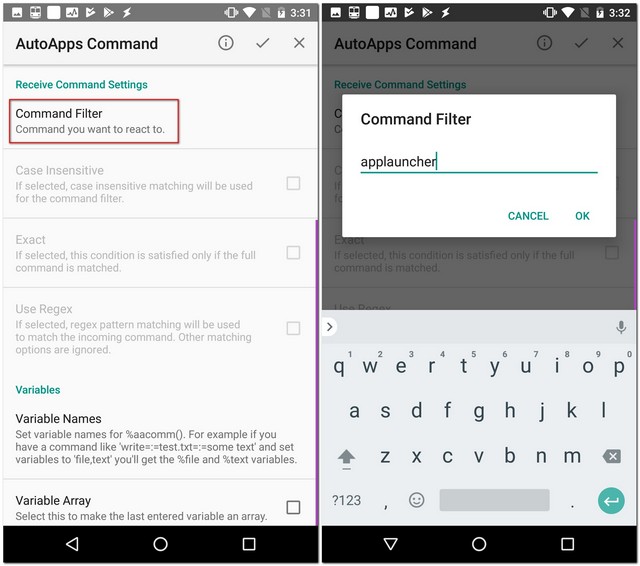
- From the screen that appears next, select "Command Filter",name information technology as "applauncher", and then tap on "OK" (Note that information technology has to be named exactly similar this). On the same screen, tick the box for the setting that reads "Exact".
- Now go back to Tasker's profile tab, and so tap on "New Task". You'll be prompted to proper name this task, but information technology'due south optional. Just call up to tap on the check mark against the input field.

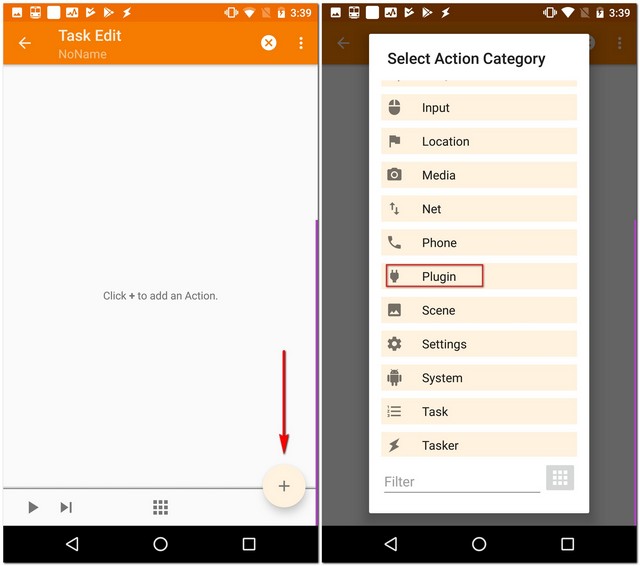
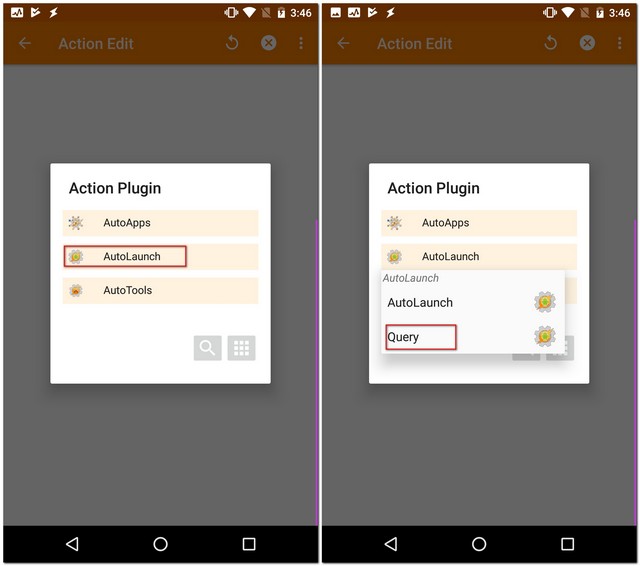
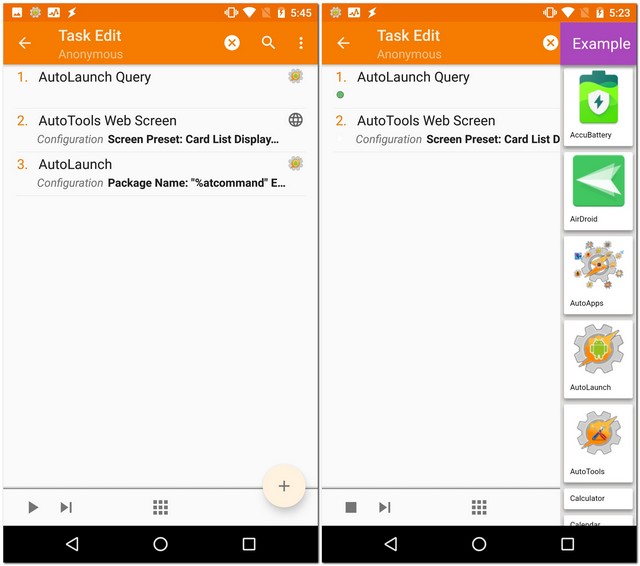
- This will have you to the "Task Edit" folio. Here, add an action by tapping on the plus icon at the bottom-correct of the screen and so choosing "Plugin".
- Here, select "AutoLaunch" and then tap on "Query".
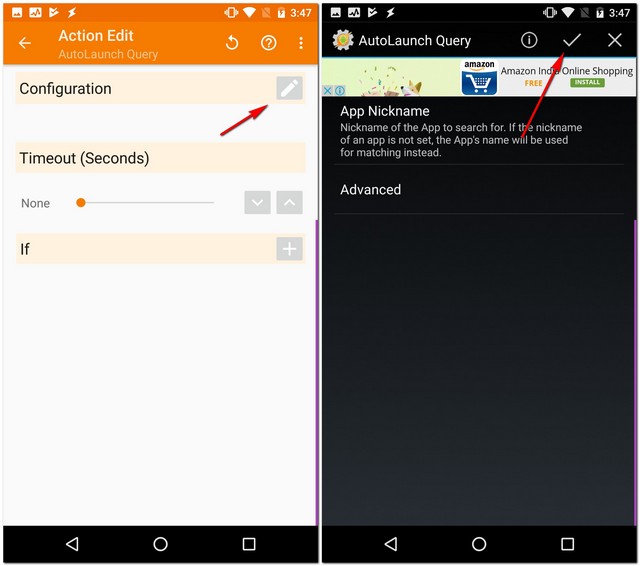
- Again, tap on the edit icon confronting "Configuration" and on the following screen, tap on the check mark on the top-correct side of the screen.
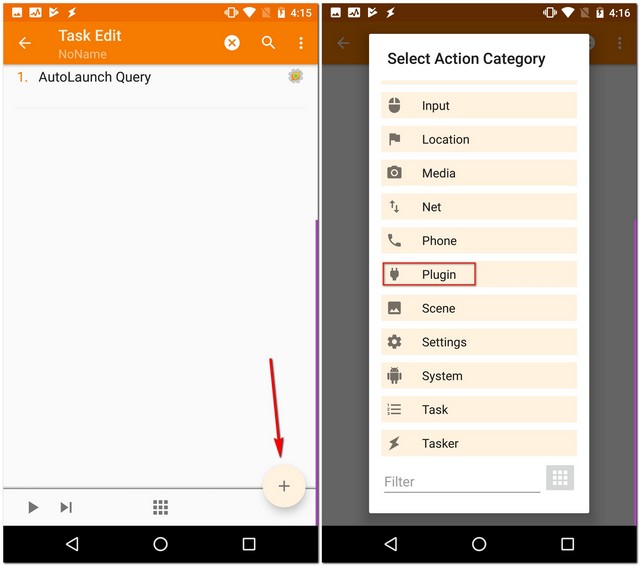
- After this, get back to the "Task Edit" page and tap on the plus icon on the lesser-right of the page. Choose the category "Plugin".
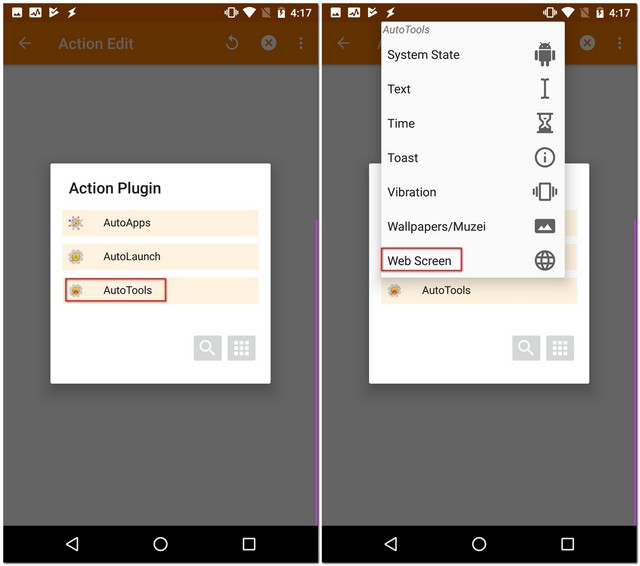
- Select the "AutoTools" plugin, and so scroll downwardly to select "Web Screen".
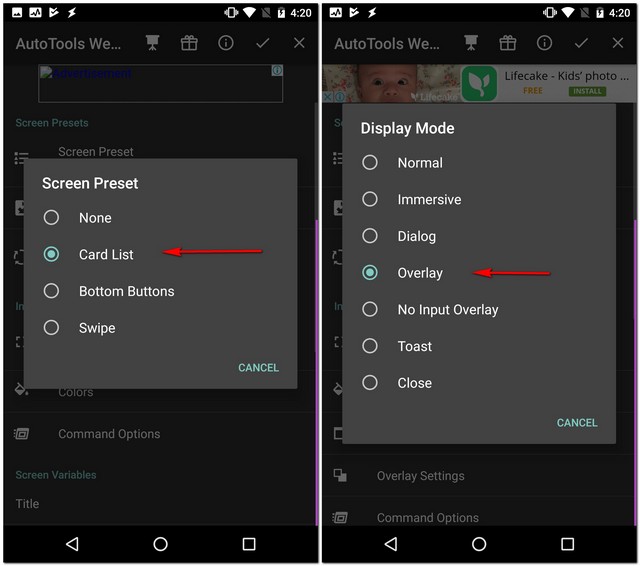
- Now edit "Configuration" and tap on "Screen Preset".
- This time, tap on "Card List", then choose the "Display Mode" equally "Overlay".
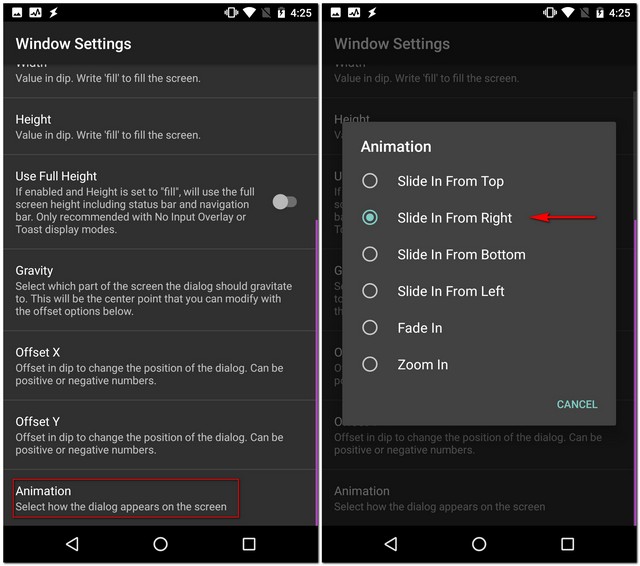
- At present go to "Window Settings", tap on "Width", type "100", and finally tap on "OK".

- Repeat the previous step by typing "fill up" in "Height" and choosing "Gravity" as "Lesser Right".
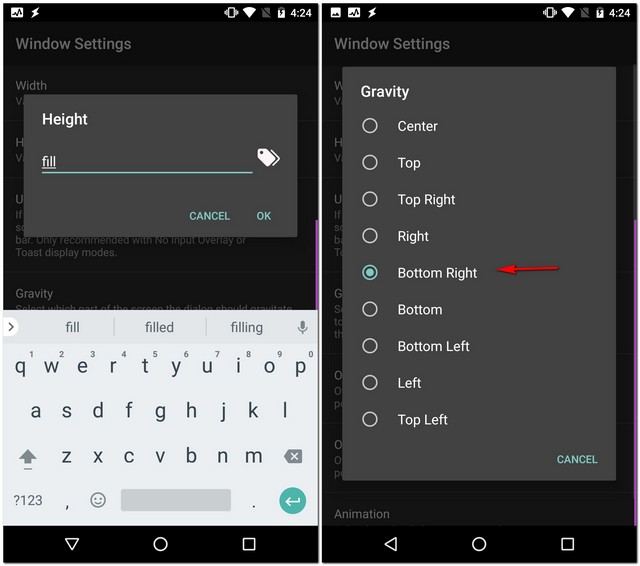
- In the same window, select the "Blitheness" every bit "Slide In From Right".
- At present go back and select "Cards". Here, select "Card Titles".
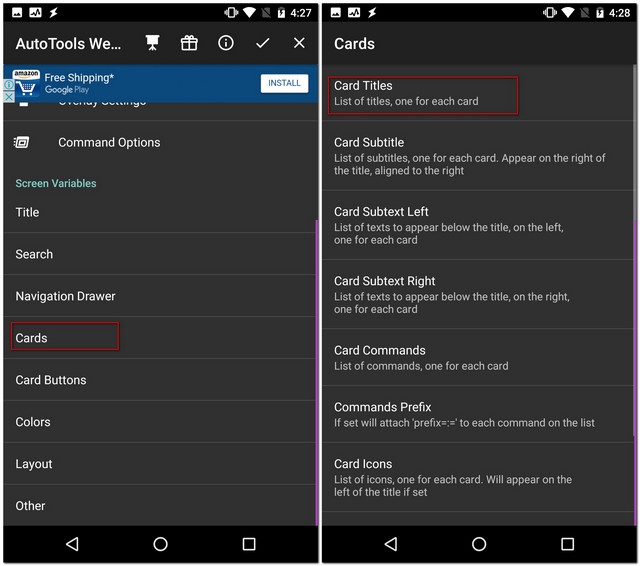
- Clear this field and and so tap on "OK".
iii. Finalize the Launcher
Post-obit are the last few steps to finalize the launcher:
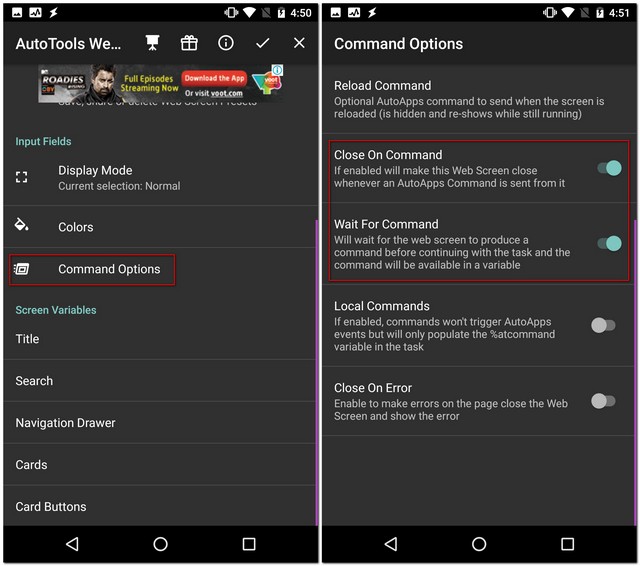
- Go to "Command Options" and plow on both "Close On Command" and "Look for Command".
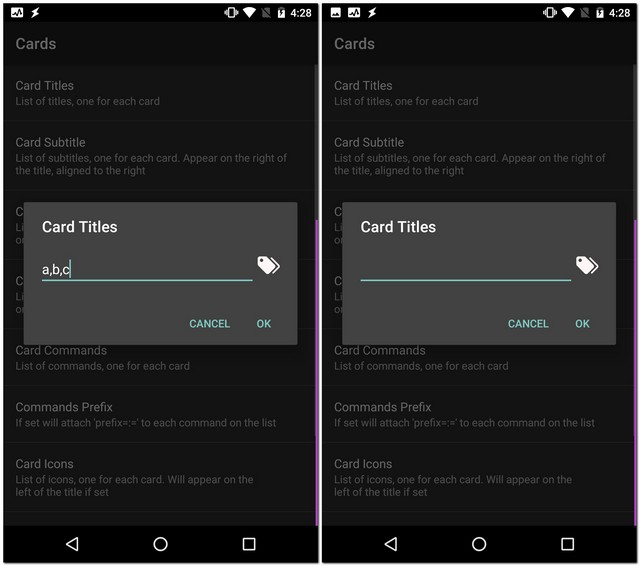
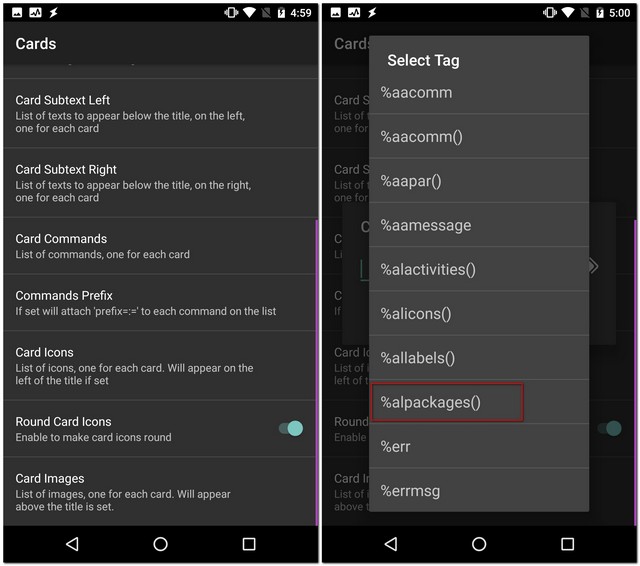
- Afterwards this, become back to "Cards", select "Card Titles", and tap on the tags icon. Hither, cull the one that says "%allabels()".
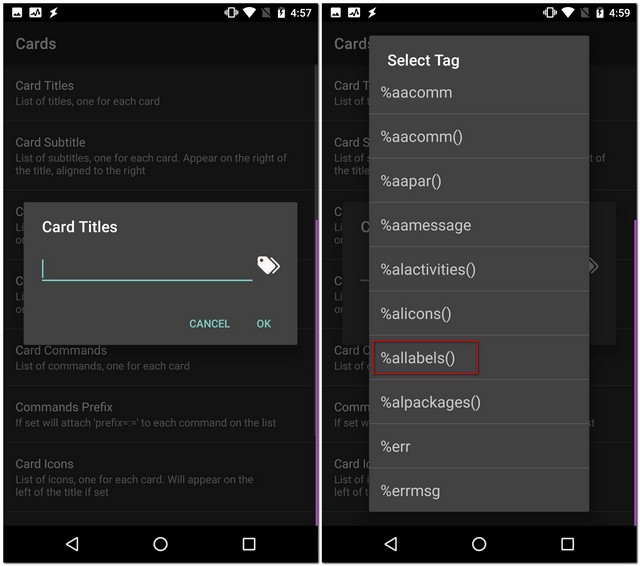
- Similarly, for "Carte Images", select "%alicons()" and for "Card Commands", select "%alpackages()" Yous may be prompted to find files during this pace. Yous can tap on "No".
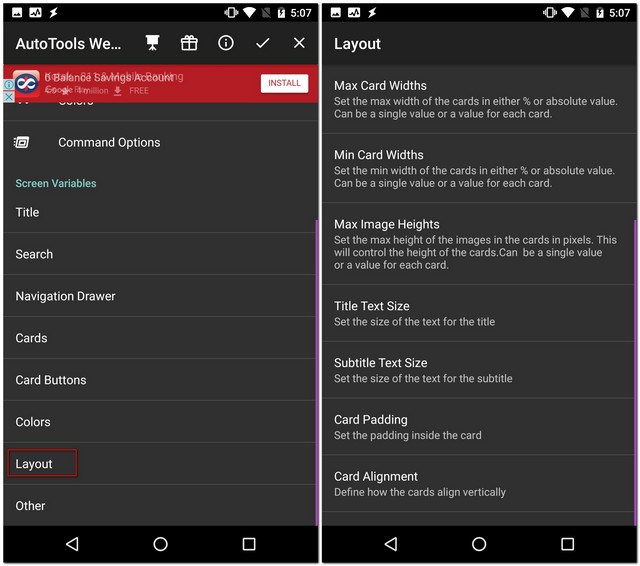
- Now go to back and go to"Layout", make the following changes:
"Max Card Widths" –> 90%
"Min Menu Widths" –> 90%
"Max Paradigm Heights" –> 75
"Title Text Size" –> x
"Card Padding" –> 0
"Card Alignment" –> Center
- After this, go dorsum to "Task Edit" page and tap on the plus button –> Plugin –> AutoLaunch –> AutoLaunch, and finally edit "Configuration".
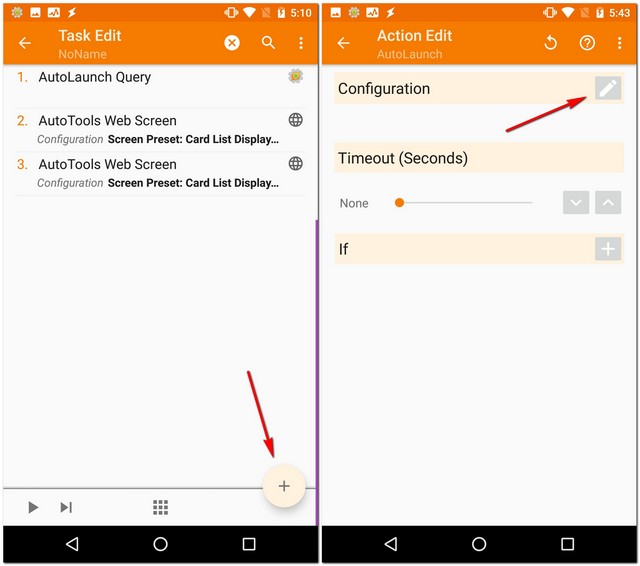
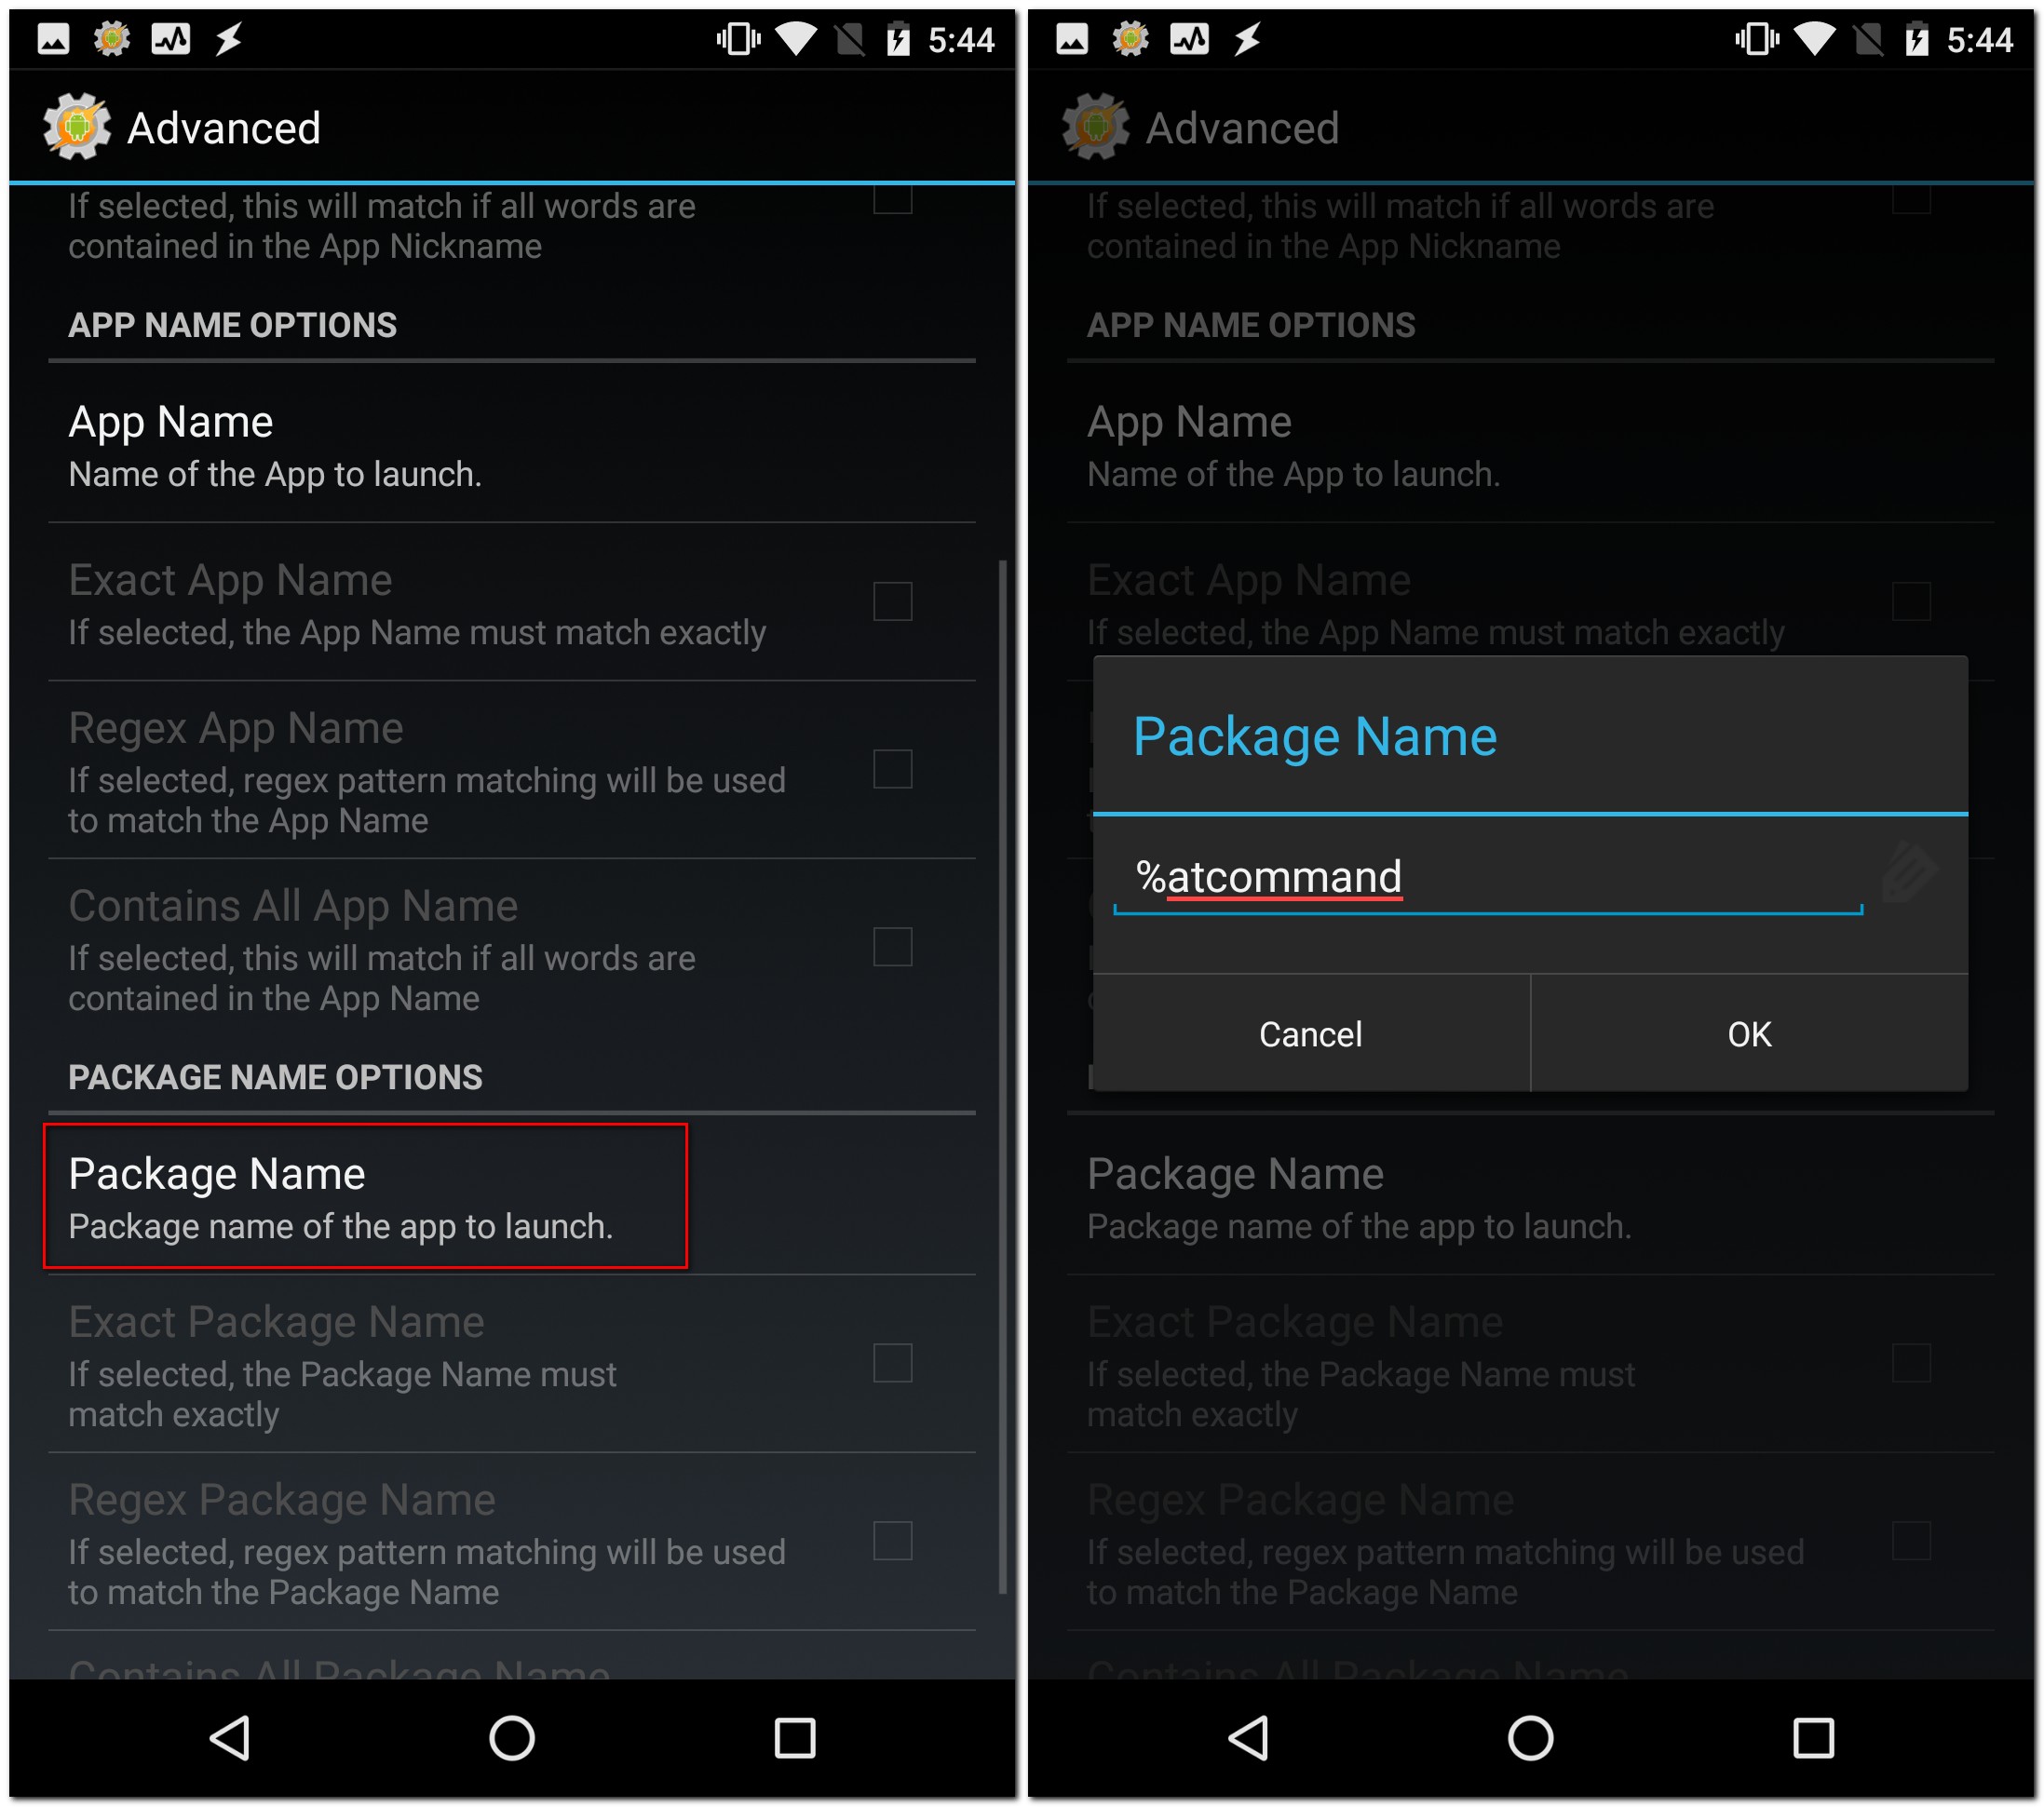
- Here, go to "Avant-garde" –> "Package Name", then tap on the tag icon and select "%atcommand" followed by tapping on the "Exact Package Name" checkbox.
- Lastly, get to the "Task Edit" page over again and tap on the play button on the bottom-left of the screen.
Y'all will now see an border card similar to that in Samsung smartphones, like the S6 Edge, S7 Edge and the Galaxy S8.
See Likewise: How to Totally Automate Android Using Tasker
Customize Your Phone Using AutoTools with Tasker
What makes Android so amazing is its customization options. Building on that, Tasker provides you with many more than avant-garde options. And if yous add together a few plugins to information technology, that list extends even further. Now that you know about one such plugin chosen AutoTools and how to employ it, y'all tin can customize your Android device as per your wish. If there are any options for which you want a detailed guideline, do allow me know in the comments section beneath and I'll be more than happy to help you.

Source: https://beebom.com/how-use-autotools-tasker/
Posted by: ledesmasaidecalown.blogspot.com
0 Response to "How to Use AutoTools with Tasker (Guide)"
Post a Comment