

How To Install Membrane Shower Pan
Bert spent 25 years working as a home-improvement and residential construction contractor in central Florida.
Learn how to properly install a shower pan membrane.
https://www.flickr.com/photos/structures/
A shower flooring membrane, sometimes called a pan liner, catches all moisture that seeps past the floor tile and directs information technology toward the floor bleed. In a perfect world, the tile floor would divert all the water toward the drain opening. All the same, in real life, small cracks form forth the shower walls and next to the drain. Caulking does assistance seal these problem areas. Unfortunately, some water passes through these areas and reaches the pan liner. The membrane protects the building from water damage, mold, and mildew.
Step 1: Fix for the Projection
Larn all necessary permits from your local building inspector before starting this project. Some communities require a permit for any plumbing piece of work. Retrieve of the permit every bit an insurance policy that protects a homeowner from non-compliant contractor workmanship. The shower floor installation portion of the projection starts subsequently a local edifice inspector approves the work, when applicable.
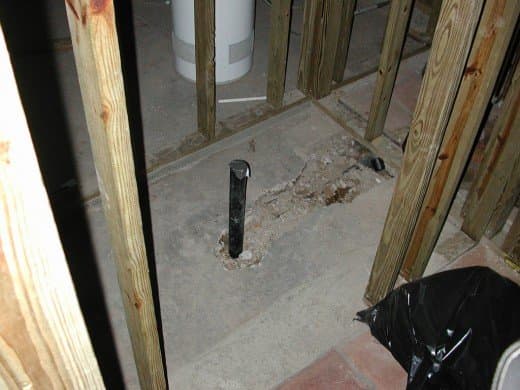
The contractor should repair the concrete slab earlier installing a shower floor membrane.
Step 2: Repair the Slap if Necessary
All quality work starts with a solid foundation. A tub drain penetrates the shower'due south subfloor virtually one wall, while the drain in a typical standup shower unremarkably sits virtually the center of the floor. If the installer keeps the drain near one wall, he must consider the shower floor'southward slope.
For instance, a tub measures v-anxiety long, which would brand the flooring's mortar base approximately 1.25 inches thicker at the walls than information technology is well-nigh the tub's original bleed opening. This would make the pitch between the new shower bleed and the closest wall extreme.
To avoid this state of affairs, the contractor must relocate the bleed penetration. If the bathroom sits on a woods subfloor, the contractor simply cuts the new opening the same size and shape as the original and uses the cutout as a scab piece to fill up in the former opening later finishing the plumbing work.
Bathrooms sitting on a concrete slab crave a little fleck more work. To relocate the bleed, a contractor must remove the physical betwixt the old bleed location and the new i. He then cuts away the old trap, adds a section of drain pipe and installs the trap and shower floor drain assembly at the new drain location. This leaves a big gaping hole in the slab. Failure to repair the slab oft leads to hereafter shower floor settlement issues, such every bit grout cracks.
- Backfill the slab repair: To limit the amount of concrete used, an installer backfills the hole with sand and the debris removed during the relocation process. Go on the backfill material below the slab's bottom surface. The depth of the mortar repair should at a minimum match the existing slab's thickness.
- Brand a batch of mortar: Mix a bag of physical with h2o, using the manufacturer's recommended ratio. I prefer to use a fast-setting ready-mix concrete for this. This blazon of mortar cures speedily enough to continue on with the task nigh immediately.
- Repair slab with mortar: Pour the mortar into the hole. Shave the surface of the mortar with a trowel until information technology matches the slab. Clean up any mess before the mortar dries.
Pre-slope
https://world wide web.flickr.com/photos/structures/
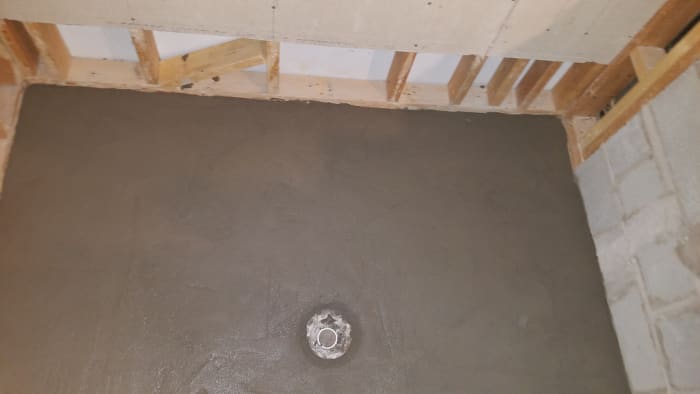
Step 3: Create the Pre-Slope
Consider the pre-slope the terminal line of defense against mold. When an installer fails to create a pre-slope, water collects on the pan liner in the problem areas. This leaves constantly moisture areas under the shower flooring for mold and mildew to grow.
- Calculate the slope: Measure from the bleed opening to the furthest wall and round upwards to the nearest foot. To calculate the pitch, multiply the length in anxiety by .25. The pre-slope should not exceed this calculation.
- Transfer the calculation to the shower: Make a pencil marker on the wall's base pate at the calculated pre-slope depth. Make a line around the shower's perimeter at this peak, using a chimera level equally a guide.
- Mix mortar: Combine a sand-mix concrete with water, using the manufacturer's recommended ratio.
- Spread mortar effectually the perimeter: Dump a modest amount of mortar on the slab. Distribute the mortar around the floor's perimeter. Pack the mortar with a trowel. Create a three-inch wide shelf at the same depth as the slope'south layout line. The shelf serves every bit an easy-to-follow guide for the final pre-gradient.
- Create the pre-slope: Commencement working on the reverse side every bit the shower door. Feather the mortar on the floor from the shelf toward the drain opening. If the plumber previously installed the shower drain flange, terminate the pre-slope flush with the top of the flange. If the plumber did not install the shower drain flange, stop the pre-gradient approximately three inches abroad from the bleed pipe. This leaves enough room for the flange to sit tight confronting the edifice's slab. Employ a flat trowel to smoothen the pre-gradient'southward surface.
Ringlet to Continue
Read More From Dengarden
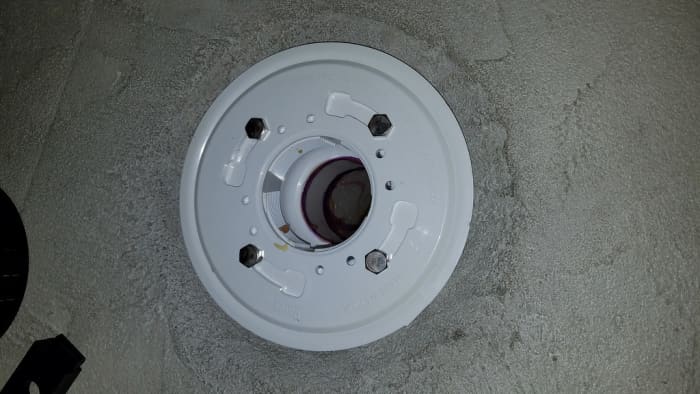
Four bolts concur the clamp ring against the flange. This model also uses viii weep holes.
https://www.flickr.com/photos/structures/
Footstep iv: Install the Drain Fitting Flange
A shower flooring drain consists of three parts: a flange, clamp ring, and drain barrel opening. The bleed flange mounts to the sewer pipe, the clamp ring holds the membrane in place, and the bleed barrel holds the finished drain grate at the correct height.
- Set the bleed fitting: Disassemble the drain plumbing fixtures. Prepare the cap and flange aside. Reinstall the flange bolts.
- Cut the sewer piping affluent with the subfloor.
- Employ PVC cement to the sewer pipe and drain flange.
- Printing the drain flange onto the sewer pipe until it rests flush with the finished subfloor.
Step five: Buy the Membrane
- Mensurate the shower floor: Measure the shower's length and width. Round each measurement up to the nearest foot.
- Add approximately 1 foot per wall to this measurement: If the shower floor calculation equaled iii-foot by five-pes, the pan liner would measure 5-foot by 7-foot.
- Purchase the shower flooring membrane: Many home comeback stores sell shower floor membrane by the linear foot and offer the membrane in dissimilar widths. Some stores also sell pre-packaged sections cut to fit common sized shower floors.
Step 6: Create Waterproof Seams
Some larger showers require more than one department of membrane to encompass the flooring and wall overlaps. In these cases, the installer must create a long-lasting waterproof seam.
- Position both pieces of membrane on the shower floor: Position each section of membrane on the shower floor, keeping the i-foot-tall wall overlaps in heed—plan for a 3- to six-inch wide seam forth any joints. If the acme section covers the bottom department significantly more than six inches, cut the excess off with pair of scissors.
- Prepare the membrane: Fold over the acme section, exposing the bottom membrane. Roughen the seam on both pieces of membrane with a wire castor. Remove any debris with a clean dry rag.
- Apply cement to the bottom department of membrane: Employ specialized cement designed specifically for pan liner. Apply a generous layer of cement approximately i inch wider than the seam beyond the entire length of the seam.
- Assemble the seam: Place the overlapping membrane on the wet cement before it starts to dry. Press the membrane sections together with a seam roller, or other like tool. Remove all raised areas, such equally folds or bubbles.
- Seal the edge: Apply a second coat of cement beyond the seam's edge. This helps seal any rolled or lifted areas. Look at least 15 minutes before standing.
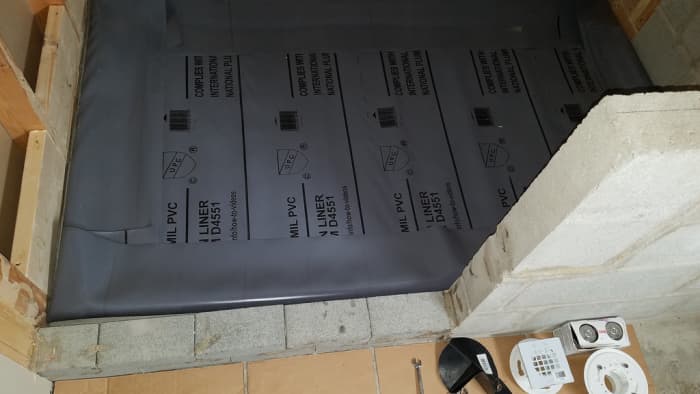
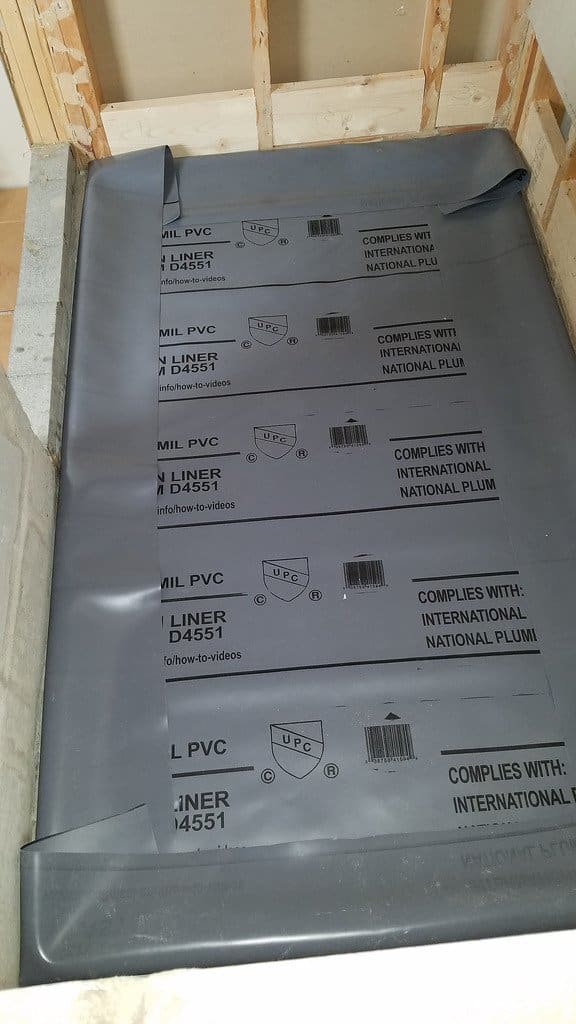
Center the membrane in the shower stall. Notice the overlap for the walls and curb.
https://www.flickr.com/photos/structures/
Step vii: Install the Membrane on the Drain Flange
- Place the membrane on the shower floor: Center it in the stall.
- Expose the drain flange: Fold the membrane in one-half, exposing the drain flange. Apply care to avert shifting the membrane's positioning inside the stall.
- Apply sealant to the flange: Run a 3/eight-inch wide bead of 100% silicone caulking around the outside perimeter of the drain flange.
- Unfold membrane: Use care to avoid shifting the membrane, especially where it contacts the silicone.
- Expose the drain flange'south bolts: Press down on the membrane with fingers and find the bleed flange bolts. Make a small slice in the membrane across each bolt caput.
- Press the membrane against the silicone: Force each bolt through its membrane slit. Use even pressure level to the membrane betwixt each bolt. Smooth out any creases.
- Install the locking ring: Position the large part of the locking band's keyhole-shaped openings over the bolt heads. Press downwardly on the ring and rotate the ring. Tighten the bolts.
- Clear the bleed opening: Remove the membrane from the pigsty in the middle of the locking ring with a utility knife.
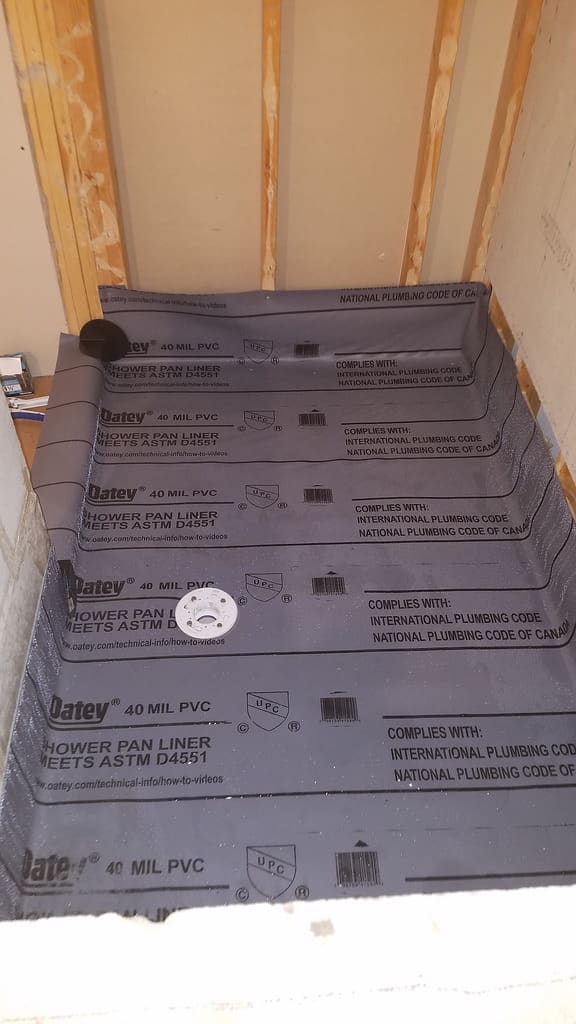
Discover how carefully the installer folded the pan liner corners. Tight corners like these brand wall board installation easy.
https://www.flickr.com/photos/structures/
Step eight: Adhere the Membrane to the Walls and Curb
- Perfect the membrane laying on the floor: Work from the drain opening toward the furthest wall from the curb. Remove whatever lumps or creases in the membrane. Shifting the membrane well-nigh the appropriate wall normally cures these issues.
- Attach the membrane to the wall studs: Start in the center of a wall and work toward each corner, repeating this step for each wall stud. Make a tight fold in the membrane where the wall meets the floor and hold it there with one mitt. Use the other hand to position the membrane against the wall stud. Attach the membrane to the wall stud with either galvanized nails or stainless steel screws. Keep all nails or screws approximately ane/2 inch below the top of the membrane.
- Fold the corners: Loose or bulky membrane corners push against the bottom of the wall boards, making them out of plumb. This creates uneven tile cuts in the corners, especially most the bottom. Dispense the membrane with both easily until it presses tightly against one wall.
- Embrace the curb: The membrane should attach to the summit of the adjourn virtually the outside edge. This requires a couple of cuts where the curb meets the walls. Carefully cut the membrane from the height of the adjourn up the wall. The membrane cloth should overlap the curb. Seal the cuts with corner guards.
Step ix: Water Exam the Membrane
- Seal the drain opening: Insert a exam plug into the drain opening. Inflate the plug with air.
- Fill up the pan up to the elevation of the adjourn with water.
- Await at to the lowest degree 4 hours and search effectually the shower'southward outside perimeter for seepage. If the pan did not comprise all the water, pull the plug and search for the leak. Mutual faults include the membrane-to-drain connection, nails below the water line and holes created when someone steps on a boom. Repair as necessary and then retest.
This article is authentic and truthful to the best of the author's noesis. Content is for informational or entertainment purposes only and does not substitute for personal counsel or professional advice in business organisation, financial, legal, or technical matters.
© 2022 Bert Holopaw

Source: https://dengarden.com/home-improvement/How-to-Install-a-Shower-Pan-Membrane
Posted by: ledesmasaidecalown.blogspot.com
0 Response to "How To Install Membrane Shower Pan"
Post a Comment